x
Transclude of round-car-screen.excalidraw
| Display | Color | ESP32-WROOM Board | ESP32-C3 Super Mini |
|---|---|---|---|
| Pin 1 | ⚫ | GND | GND |
| Pin 2 | ⚪ | GPIO27 (DC) | GPIO2 |
| Pin 3 | 🟡 | GPIO18 (SCLK) | GPIO4 |
| Pin 4 | 🟢 | GPIO23 (MOSI) | GPIO6 |
| Pin 5 | 🟠 | GPIO33 (RST) | GPIO3 |
| Pin 6 | 🔴 | 3.3V | 3.3V |
| Set CS to -1 in the code. |
The Trace Analysis
The ribbon cable has T128HC-412-01 V2 printed on it, which confirms it is a standard 1.28-inch GC9A01 display. These bare screens use a standardized 12-pin layout (numbered 12 to 1 from left to right in your photo).
If you look closely at the green printed circuit board (PCB), you can see it acts as a simple breakout adapter. The manufacturer hardwired the Reset and Backlight pins directly to the power and ground planes on the board itself, reducing the 12 pins down to just the 6 essential pins you see on the socket.
Driving it with ESP32 WROOM-32D
Library Installation
Important Hardware Warning: This screen uses 3.3V logic.
For the software side, install the TFT_eSPI library by Bodmer in your Arduino IDE. You will need to open the User_Setup.h file inside the library’s folder, uncomment the line for #define GC9A01_DRIVER, and map your custom CS and DC digital pins to match how you wired them.
- Go to your
Documents/Arduino/libraries/TFT_eSPIfolder. - Open the file named
User_Setup.hin a text editor. - Add the following information and comment out other lines;
#define USER_SETUP_INFO "User_Setup"

#define GC9A01_DRIVER

#define TFT_WIDTH  240

#define TFT_WIDTH  240

# PIN definitions on the board
#define TFT_MOSI 23
#define TFT_SCLK 18
#define TFT_DC 27
#define TFT_RST 33
#define TFT_CS -1

#define LOAD_GLCD   // Font 1. Original Adafruit 8 pixel font needs ~1820 bytes in FLASH

#define LOAD_FONT2  // Font 2. Small 16 pixel high font, needs ~3534 bytes in FLASH, 96 characters

#define LOAD_FONT4  // Font 4. Medium 26 pixel high font, needs ~5848 bytes in FLASH, 96 characters

#define LOAD_FONT6  // Font 6. Large 48 pixel font, needs ~2666 bytes in FLASH, only characters 1234567890:-.apm

#define LOAD_FONT7  // Font 7. 7 segment 48 pixel font, needs ~2438 bytes in FLASH, only characters 1234567890:-.

#define LOAD_FONT8  // Font 8. Large 75 pixel font needs ~3256 bytes in FLASH, only characters 1234567890:-.

//#define LOAD_FONT8N // Font 8. Alternative to Font 8 above, slightly narrower, so 3 digits fit a 160 pixel TFT

#define LOAD_GFXFF  // FreeFonts. Include access to the 48 Adafruit_GFX free fonts FF1 to FF48 and custom fonts

// Comment out the #define below to stop the SPIFFS filing system and smooth font code being loaded

// this will save ~20kbytes of FLASH

#define SMOOTH_FONT

#define SPI_FREQUENCY  27000000
#define SPI_READ_FREQUENCY  20000000
#define SPI_TOUCH_FREQUENCY  2500000
Test Code
Upload to the ESP32 board.
Choose the board ESP32 Dev Module
#include <SPI.h>
#include <TFT_eSPI.h>

TFT_eSPI tft = TFT_eSPI();

void setup() {
  Serial.begin(115200);
  Serial.println("Initializing screen...");

  tft.init();
  tft.setRotation(0);
  tft.fillScreen(TFT_RED); // Fill screen with Red

  Serial.println("Command sent.");
}

void loop() {
  // Toggle between red and blue every 2 seconds
  tft.fillScreen(TFT_RED);
  delay(2000);
  tft.fillScreen(TFT_BLUE);
  delay(2000);
}
Driving it with ESP32 C3 Super Mini
WARNING
TFT_eSPI library does not work with newer ESP32 C3 Super Mini series. Downgrading the esp32 board version installed on Arduino IDE is suggested is reported as fix. The required version is declared as
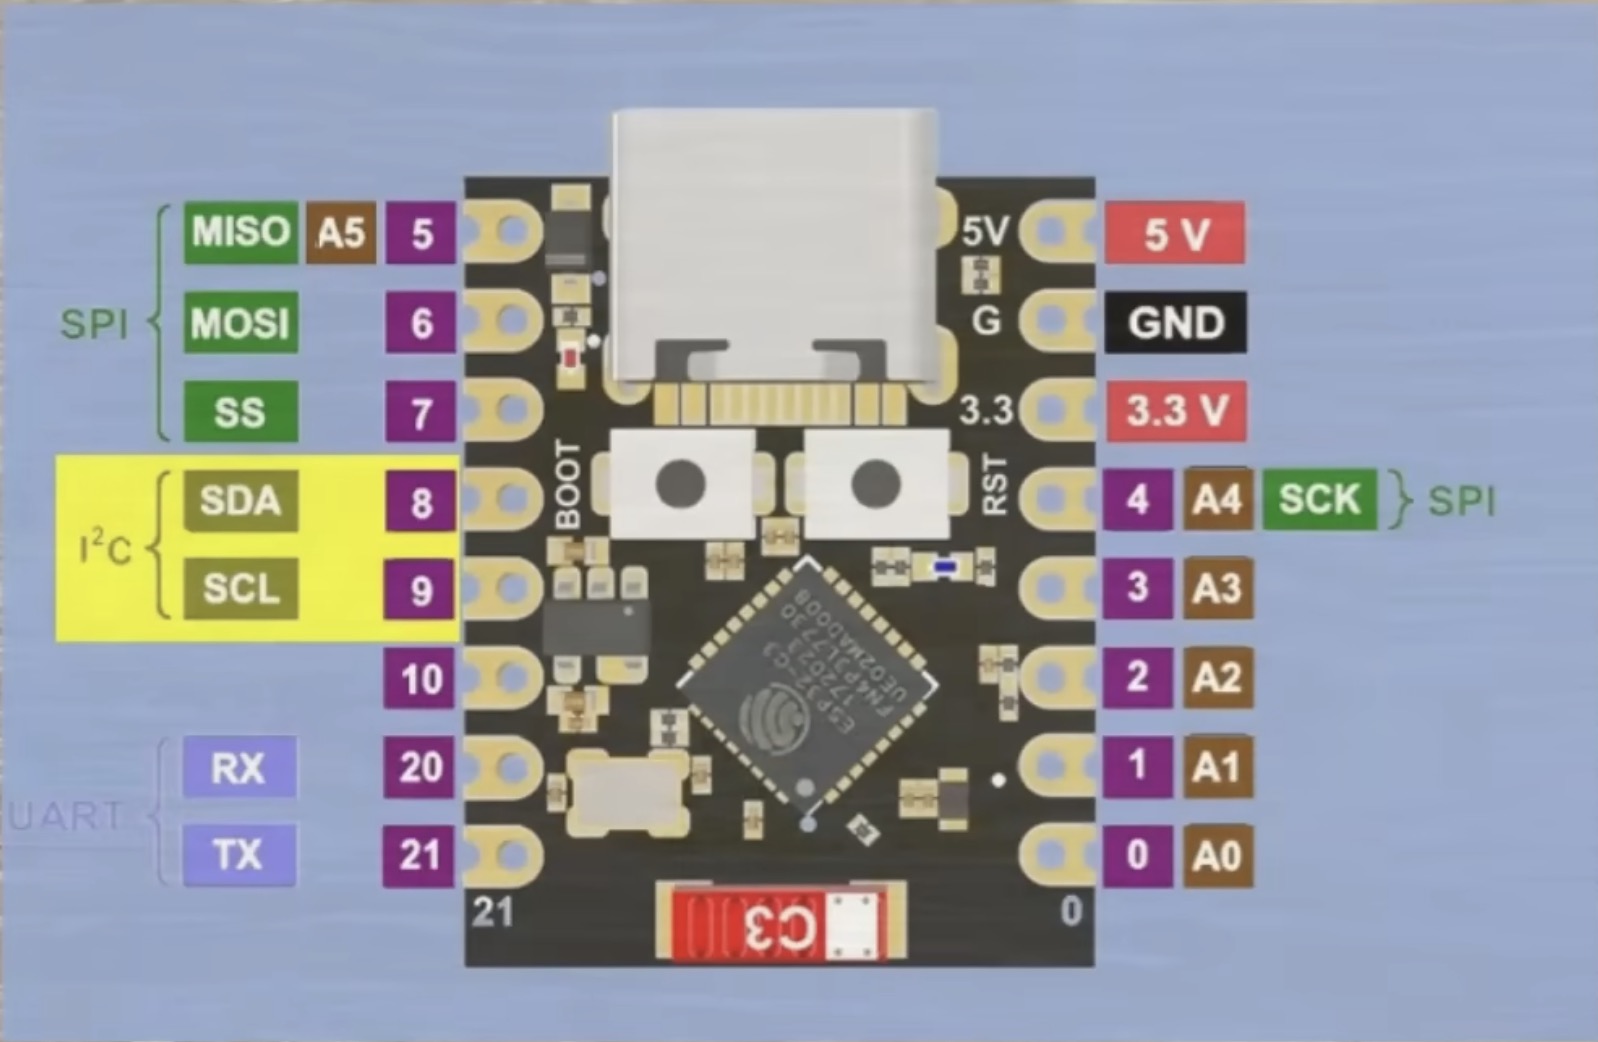
2.0.14.Pinout reference for ESP32-C3 Super Mini, link
Hardware Connection
Refer to the table at top of the page.
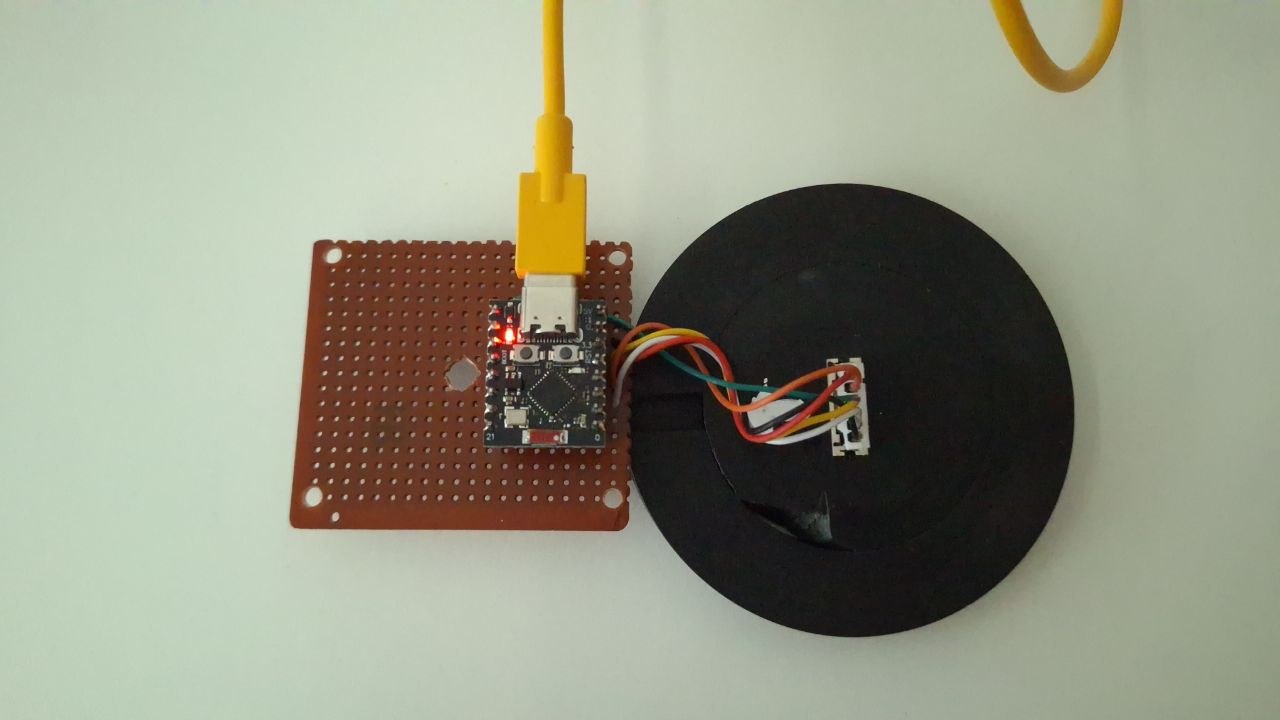
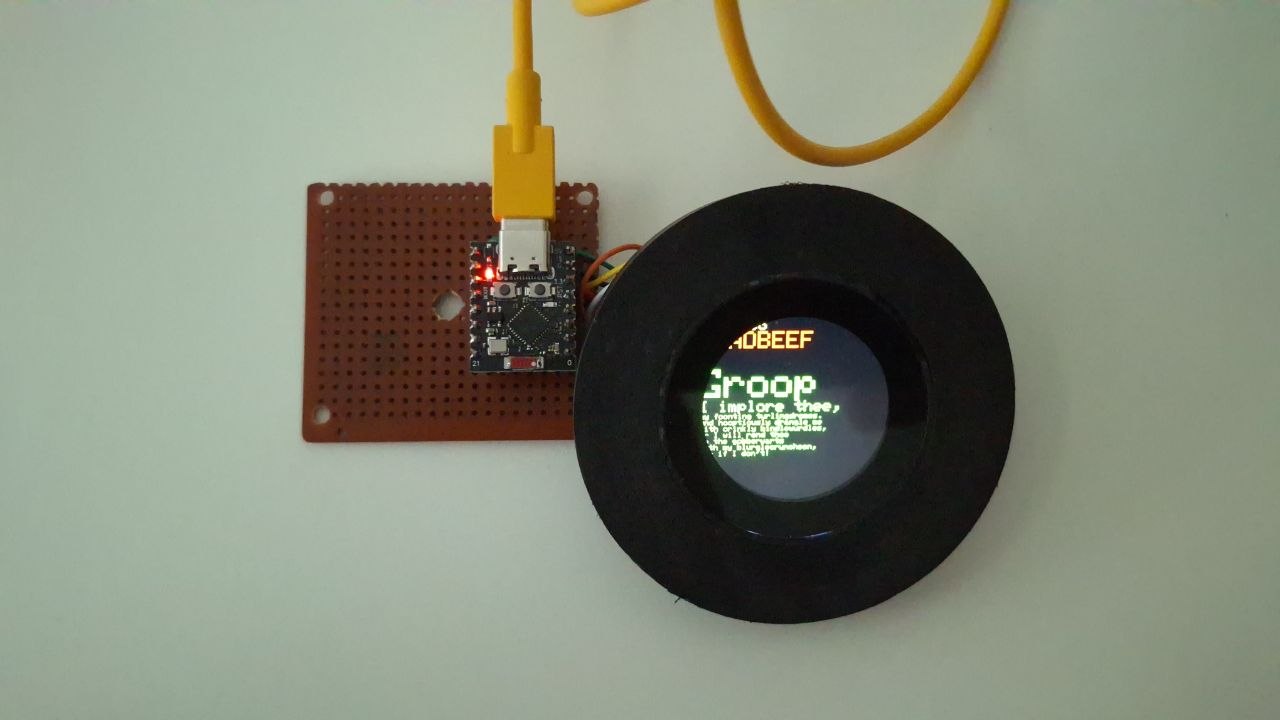
The following test code uses Adafruit_GC9A01A library.
Code Reference
#include <SPI.h>
#include <Adafruit_GFX.h>
#include <Adafruit_GC9A01A.h>

#define TFT_DC   2
#define TFT_RST  3
#define TFT_CS  -1  // Kept as -1 since CS is wired to GND

// HARDWARE SPI CONSTRUCTOR
// Passing only CS, DC, and RST tells the library to use the native Hardware SPI bus (Pins 4 & 6)
Adafruit_GC9A01A tft(TFT_CS, TFT_DC, TFT_RST);

void setup() {
  Serial.begin(115200);
  delay(500);

  Serial.println("Starting Native Hardware SPI...");
  tft.begin();

  // Set the hardware SPI speed to 40MHz.
  // At this speed, filling the screen happens almost instantly!
  SPI.setFrequency(40000000);

  tft.fillScreen(GC9A01A_GREEN);
}

void loop() {
  tft.fillScreen(GC9A01A_GREEN);
  delay(1000);
  tft.fillScreen(GC9A01A_MAGENTA);
  delay(1000);
}
Libraries
- GitHub - gavinlyonsrepo/GC9A01_LTSM: Arduino library for GC9A01 240×240 SPI TFT displays—supports hardware/software SPI, rotation, scroll, bitmaps, fonts, power modes, and advanced graphics.
- GitHub - sbcshop/RoundyFi: RoundyFi is a round LCD display based on ESP-12E along with a compact and stylish 1.28-inch display module of 240×240 resolution, 65K RGB colors, clear and colorful…
- GitHub - adafruit/Adafruit_GC9A01A: Adafruit_GFX-compatible library for GC9A01A display driver
- GitHub - cbm80amiga/GC9A01A_AVR: Fast SPI library for the GC9A01A IPS display optimized for AVR Arduinos
Play Video Files As C Files
The following code was tested on ESP32-C3 Super Mini board.
- Find a gif file
- The size should be lower than 500 kb. You can use EZGif online app for free
- Set the size of the image according to your display resolution.
- Convert it to C file via image to C or browser-based one.
- Move the generated .h file to your project directory.
#include <SPI.h>
#include <Adafruit_GFX.h>
#include <Adafruit_GC9A01A.h>
#include <AnimatedGIF.h>

// Include your converted GIF array file
#include "eyes-240-4.h"

#define TFT_DC    2
#define TFT_RST   3
#define TFT_CS   -1  // Tied to Ground

// Hardware SPI constructor (Uses C3 native Clock=4, MOSI/SDA=6)
Adafruit_GC9A01A tft(TFT_CS, TFT_DC, TFT_RST);
AnimatedGIF gif;

#define DISPLAY_WIDTH  240
#define DISPLAY_HEIGHT 240

// Global variables to center the GIF on the round screen
int xOffset = 0;
int yOffset = 0;

// Draw a line of the image directly on the LCD
void GIFDraw(GIFDRAW *pDraw) {
    uint8_t *s;
    uint16_t *d, *usPalette, usTemp[240];
    int x, y, iWidth;

    iWidth = pDraw->iWidth;
    if (iWidth + pDraw->iX > DISPLAY_WIDTH) {
       iWidth = DISPLAY_WIDTH - pDraw->iX;
    }

    usPalette = pDraw->pPalette; // THIS is what fixes the colors!
    y = pDraw->iY + pDraw->y + yOffset; // Apply vertical centering

    // Out of bounds check
    if (y >= DISPLAY_HEIGHT || y < 0 || pDraw->iX >= DISPLAY_WIDTH || iWidth < 1) {
       return;
    }

    s = pDraw->pPixels;
    if (pDraw->ucDisposalMethod == 2) { // restore to background color
      for (x = 0; x < iWidth; x++) {
        if (s[x] == pDraw->ucTransparent) s[x] = pDraw->ucBackground;
      }
      pDraw->ucHasTransparency = 0;
    }

    // Apply the new pixels to the main image
    if (pDraw->ucHasTransparency) { // if transparency used
      uint8_t *pEnd, c, ucTransparent = pDraw->ucTransparent;
      int x, iCount;
      pEnd = s + iWidth;
      x = 0;
      iCount = 0; // count non-transparent pixels

      while(x < iWidth) {
        c = ucTransparent - 1;
        d = usTemp;
        while (c != ucTransparent && s < pEnd) {
          c = *s++;
          if (c == ucTransparent) {
            s--; // back up to treat it like transparent
          } else { // opaque
             *d++ = usPalette[c];
             iCount++;
          }
        } // while looking for opaque pixels

        if (iCount) { // any opaque pixels?
          tft.startWrite();
          // Apply horizontal centering to the active window
          tft.setAddrWindow(pDraw->iX + x + xOffset, y, iCount, 1);
          tft.writePixels(usTemp, iCount, false, false);
          tft.endWrite();
          x += iCount;
          iCount = 0;
        }

        // look for a run of transparent pixels
        c = ucTransparent;
        while (c == ucTransparent && s < pEnd) {
          c = *s++;
          if (c == ucTransparent)
             iCount++;
          else
             s--;
        }
        if (iCount) {
          x += iCount; // skip these
          iCount = 0;
        }
      }
    } else {
      s = pDraw->pPixels;
      // Translate the 8-bit pixels through the RGB565 palette
      for (x = 0; x < iWidth; x++) {
        usTemp[x] = usPalette[*s++];
      }
      tft.startWrite();
      // Apply horizontal centering to the active window
      tft.setAddrWindow(pDraw->iX + xOffset, y, iWidth, 1);
      tft.writePixels(usTemp, iWidth, false, false);
      tft.endWrite();
    }
}

void setup() {
  Serial.begin(115200);
  delay(500);

  tft.begin();
  // Set the hardware SPI engine to maximum speed
  SPI.setFrequency(40000000);

  tft.fillScreen(GC9A01A_BLACK);

  // GC9A01 usually requires Big Endian for colors to map properly.
  // If your colors look swapped (e.g., Red looks Blue), change this to LITTLE_ENDIAN_PIXELS
  gif.begin(LITTLE_ENDIAN_PIXELS);  //BIG_ENDIAN_PIXELS

  // tft.invertDisplay(true);
}

void loop() {
  if (gif.open((uint8_t *)my_video_gif, sizeof(my_video_gif), GIFDraw)) {

    // Calculate the math to perfectly center the GIF on the round screen
    xOffset = (DISPLAY_WIDTH - gif.getCanvasWidth()) / 2;
    yOffset = (DISPLAY_HEIGHT - gif.getCanvasHeight()) / 2;

    Serial.printf("Playing GIF; Canvas = %d x %d\n", gif.getCanvasWidth(), gif.getCanvasHeight());

    while (gif.playFrame(true, NULL)) {
      yield(); // Keep background ESP32 tasks running smoothly
    }
    gif.close();
  }
}Play Video as MJPEG Files
Real-time Mirroring
- With the Serial Monitor - No Upload, Instant Display Prototyping - Magic You need to send commands one by one from the Console in Arduino IDE
- Try with my original P-OLED Mirror Display